How to use Clipboard Zero
Techs fill out the job on their phone and get it signed. The office checks it, bills it and files it. Each part takes about five minutes to learn.
For techs
Everything happens on your phone.
Open the link and log in
Your office sends you a web link, an email and a password. Open the link on your phone and log in.
Then put it on your home screen so it opens like any other app:
- iPhone: in Safari, tap the Share button, then Add to Home Screen.
- Android: in Chrome, tap the ⋮ menu, then Install app or Add to Home screen.
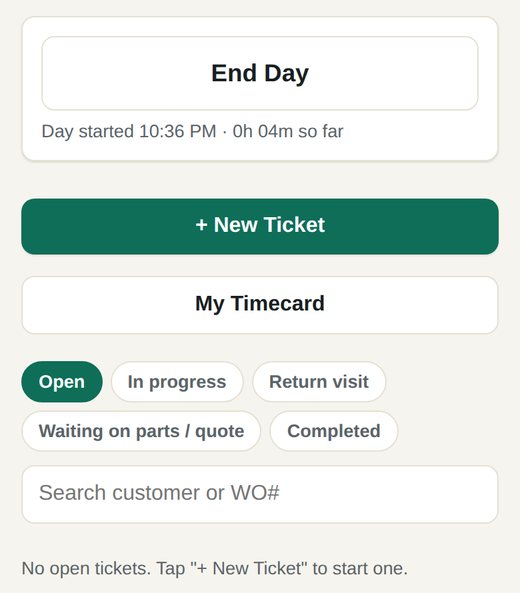
At the top, tap Start Day when your work day starts (and End Day when it ends). That's your paid time.
Below it are your jobs. Jobs the office booked for you are at the top, under Today and Coming up, with what's wrong. Tap the chips (Open, In progress, Return visit, Waiting on parts / quote, Completed) or search by customer or WO# to find one.
Head out, then start the ticket when you get there
A job the office booked for you: tap it. Tap Directions to open the address in your maps app, and On my way to tell the office (and the customer, if your company sends texts) that you're coming, with about how long the drive is. When you get there, tap Start.
No booked job?
- Tap + New Ticket.
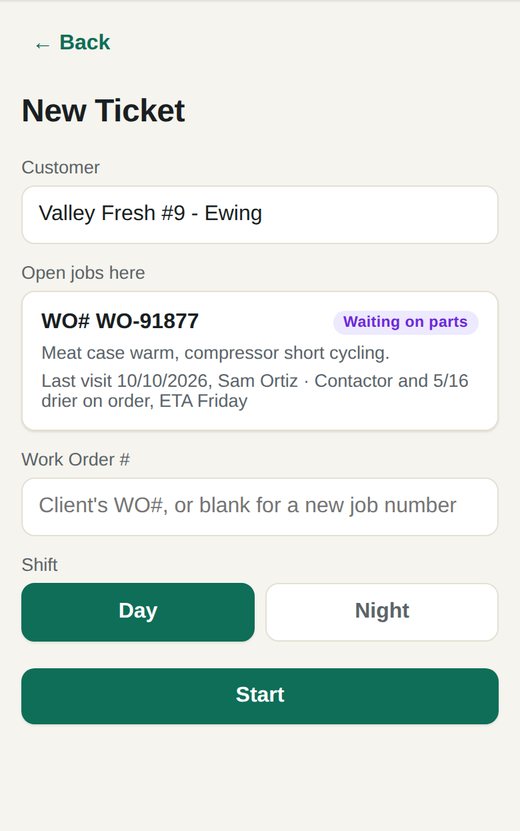
- Type a few letters of the customer or store and pick it from the list. The name and address fill in for you.
- Under Open jobs here you'll see any job that's already open at that store. Coming back to one? Tap it. You'll see the last visit's notes and the parts that were needed.
- A new job? Enter the customer's work order number, or leave it blank and the app gives the job a number.
- Tap Start. Your start time is recorded, and the office can see you're on site. If you haven't started your day yet, it asks first.
Fill it in as you work
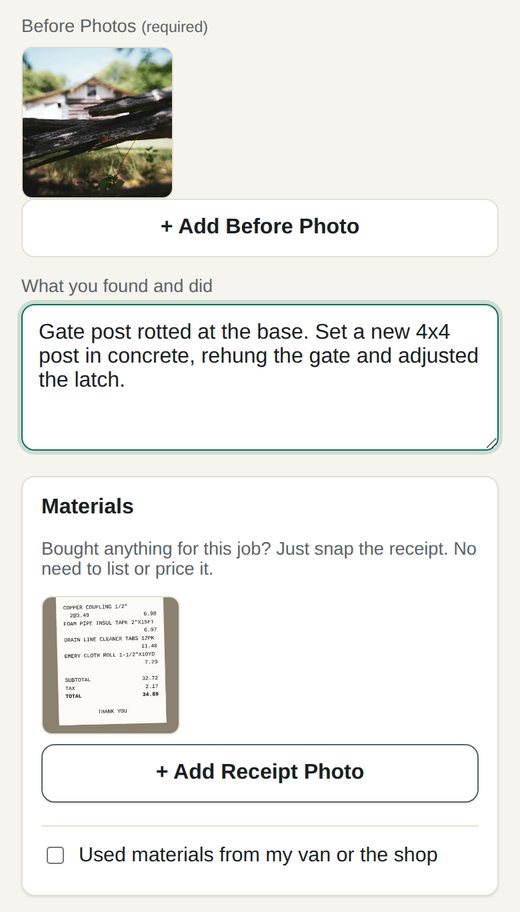
- Before photos: when you get there, before you touch anything, tap + Add Before Photo and take a picture or two of the problem.
- What you found and did: write it in plain words. A couple of sentences is plenty.
- Receipts: bought something for the job? Tap + Add Receipt Photo and snap the receipt. You don't need to type out the items or prices.
- From your van or the shop: turn on Used materials from my van or the shop and search for what you used. Not on the list? Tap + Add "…" as a new item, set how much (like 1 lb of screws), and the office prices it.
- Parts Needed: tick it, add the part, and tap + Add Nameplate Photo to photograph the model tag. The office's price request to the supplier goes out with that photo.
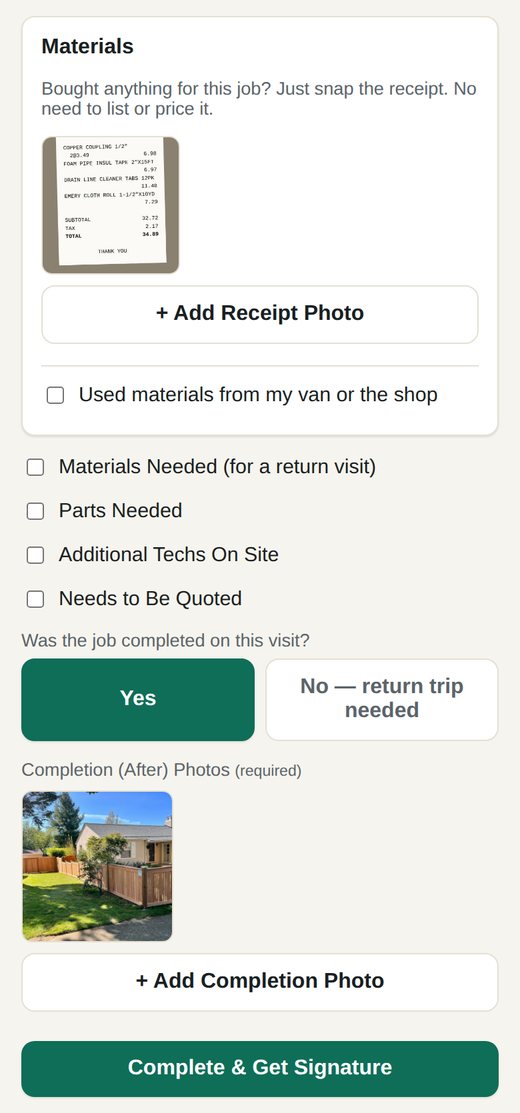
- Other checkboxes: tick Materials Needed, Additional Techs On Site or Needs to Be Quoted when they apply.
Finish and get it signed
At the bottom, answer Was the job completed on this visit?
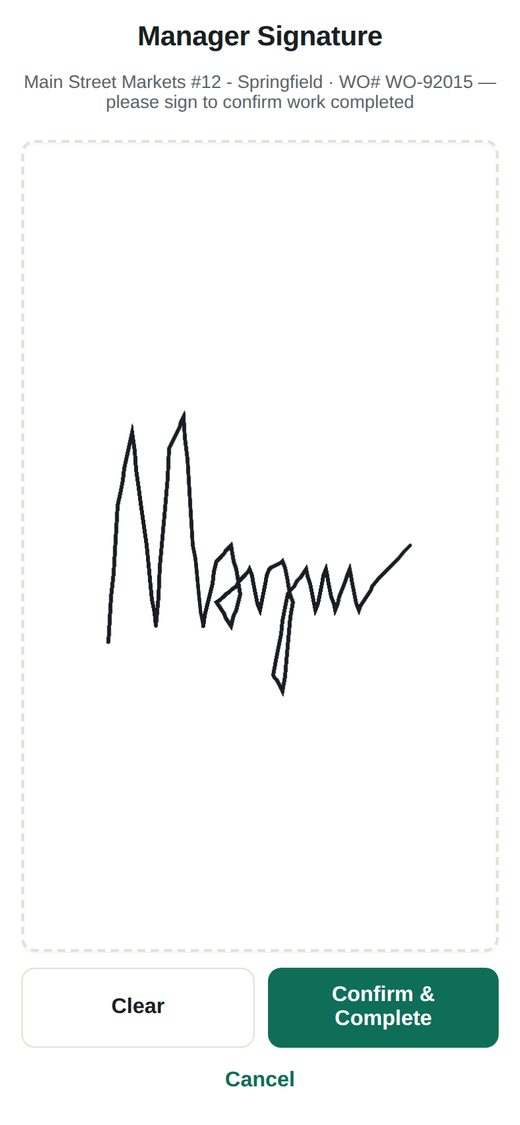
Yes: add completion (after) photos of the finished work, then tap Complete & Get Signature. Hand the phone to the manager or customer, have them sign with a finger, and tap Confirm & Complete. That's it. The office has it.
No, return trip needed: pick what it's waiting on (Parts, Approval / quote, More time or Other), add a short note if it helps, like "compressor on order, ETA Friday", and add photos of what still needs fixing. Then tap End Visit — Return Trip Needed. The office sees what the job is waiting on. When you come back, pick the job under Open jobs here.
End your day
Tap End Day when you're done for the day. Your paid time runs from Start Day to End Day, wherever you went in between. Your time on each job still comes from its Start and Complete taps, for the customer's bill.
Tap My Timecard to see your days and hours. Forgot to tap Start Day, or tapped at the wrong time? Tap Request a fix, pick the right time, say why, and the office approves it.
For the office
Works on any computer, best on a big screen.
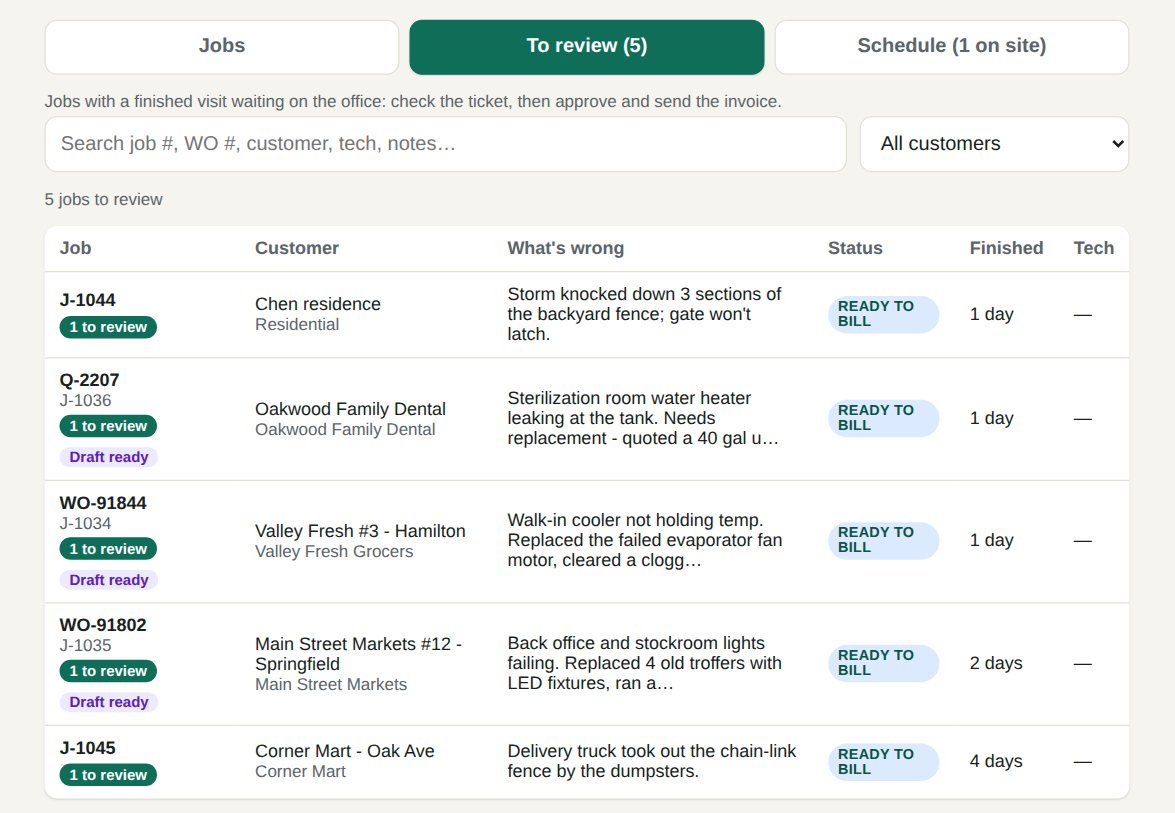
Check finished jobs under To review
Everything for the office is on one page, Jobs. Click To review to see every job with a visit the tech finished and nobody has billed yet, one row per job, newest first. A job with two finished visits says 2 to review. Search by job number, work order, store, tech or notes. If your plan includes AI invoice drafts, jobs whose invoice is ready say Draft ready.
Tap Notify me when invoices are ready once on each computer, and you'll get a notification when a draft is waiting.
Open a job and look it over
Click a job to open it. At the top is the job: the customer, what's wrong, and a green line that says what's next (like "Waiting on 1 supplier for parts prices"). Under Visits, the visit waiting on you is already open with everything the tech sent. The tabs Work, Photos, Materials, Quote, Invoice and Messages each show one part of it: the times on site, who was there and the notes; the before, after, receipt and nameplate photos; materials and parts; and so on. All shows everything at once, and your computer remembers which you like. To see another visit, click its Open ticket.
You can fix a typo in the notes or the work order number, then click Save Changes.
Quote a job
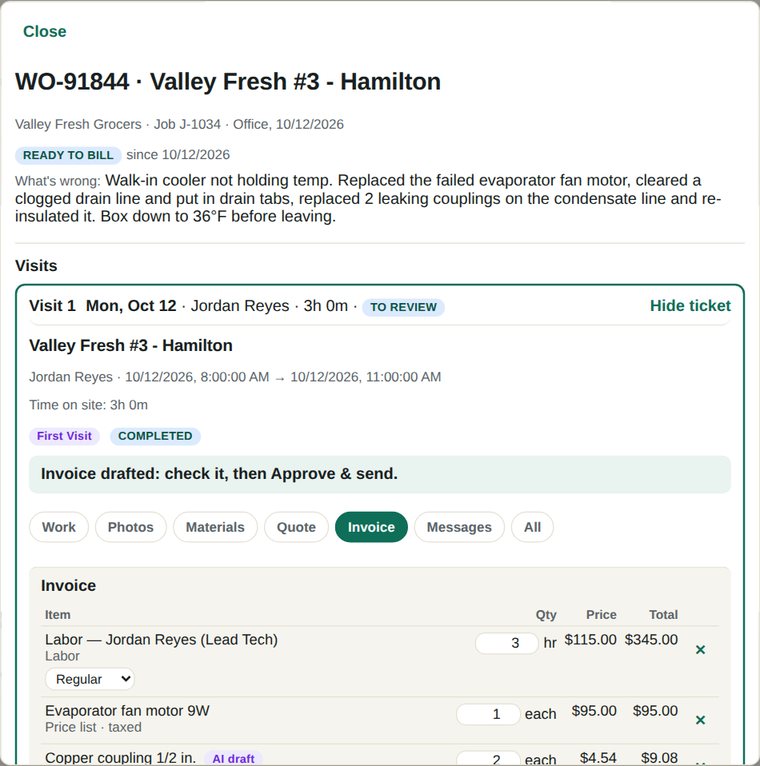
When a tech ticks Needs to Be Quoted, the job shows Waiting on approval. Open the job and click + Start a quote on its visit. With AI drafts, click Draft quote with AI, or turn on automatic drafts and the quote is waiting for you. The AI reads what the tech wrote, the measurements and the photos (including the nameplate), and writes the scope of work, the labor and the materials. It never makes up a price. Prices come from your Price Book, your suppliers and the websites you buy from.
Parts from a supplier: click Ask suppliers for prices. Each supplier gets one email listing what you need, with the part numbers. Their answer comes back to your own email address, and the app reads it within a couple of minutes: the prices fill in, along with any shipping they charge, even when the quote is an attached PDF, photo, Word or Excel file. If a supplier starts a new email instead of replying, paste their answer under Price requests or click Upload their quote (PDF, photo, Word or Excel). Parts Needed on a ticket is asked for automatically, with the nameplate photo attached; turn that off under Settings → Quotes if you'd rather click. If you pay sales tax on parts, turn on We pay sales tax on parts we buy under Settings → Quotes, and a supplier's tax is added to the part's cost. Parts from a website: click Look up website prices. For sites that allow it, the app finds the part and fills in the price and the product link. For the rest, you get a ready-made search link. If what it found isn't the right size or part number, it says so in red and leaves the price for you.
Check each line, then click Send quote to client for approval. The client gets a link where they can see the quote and approve or decline it by typing their name. If you take deposits, they see how much is due and how to pay. Once they approve, the job shows Quote Approved and it's ready to schedule.
Check the invoice, then Approve & send
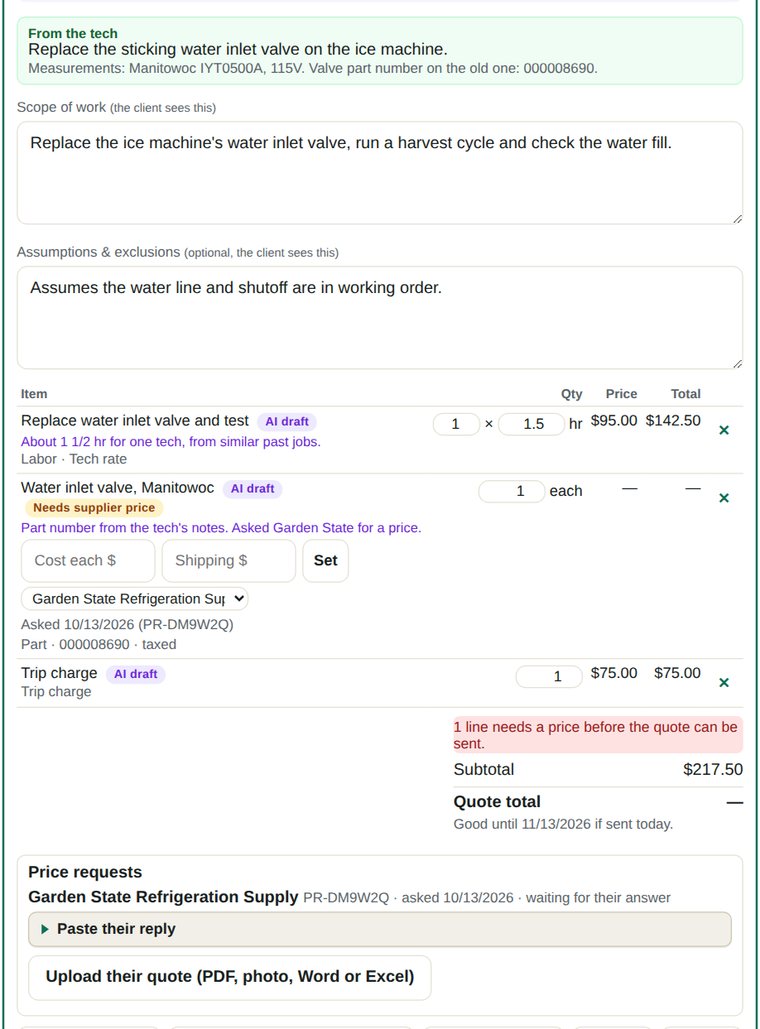
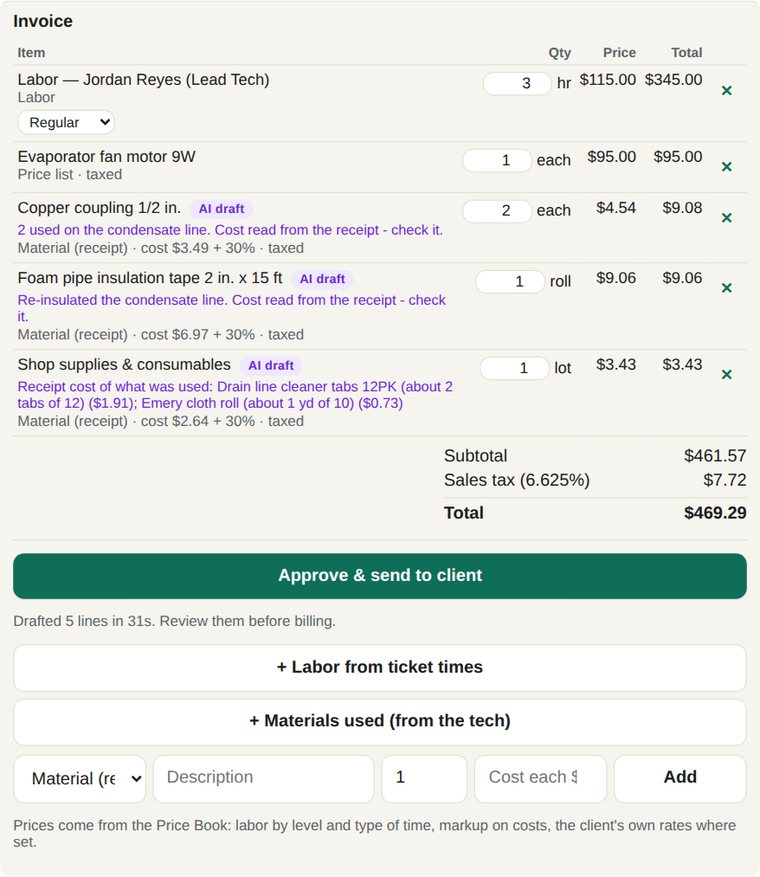
With AI drafts, the invoice is already written. Labor comes from the ticket times, materials come from the receipts at cost plus your markup, and prices come from your Price Book. Each line shows its cost and markup (like "cost $5.00 + 25%"). Read each line and fix anything that looks off.
Without AI drafts, build it in two clicks: + Labor from ticket times and + Materials used, then add any other lines.
When it looks right, click Approve & send to client. You'll see the total and who it goes to before anything is sent. The job is then marked billed.
Find any job's photos on the Photos page
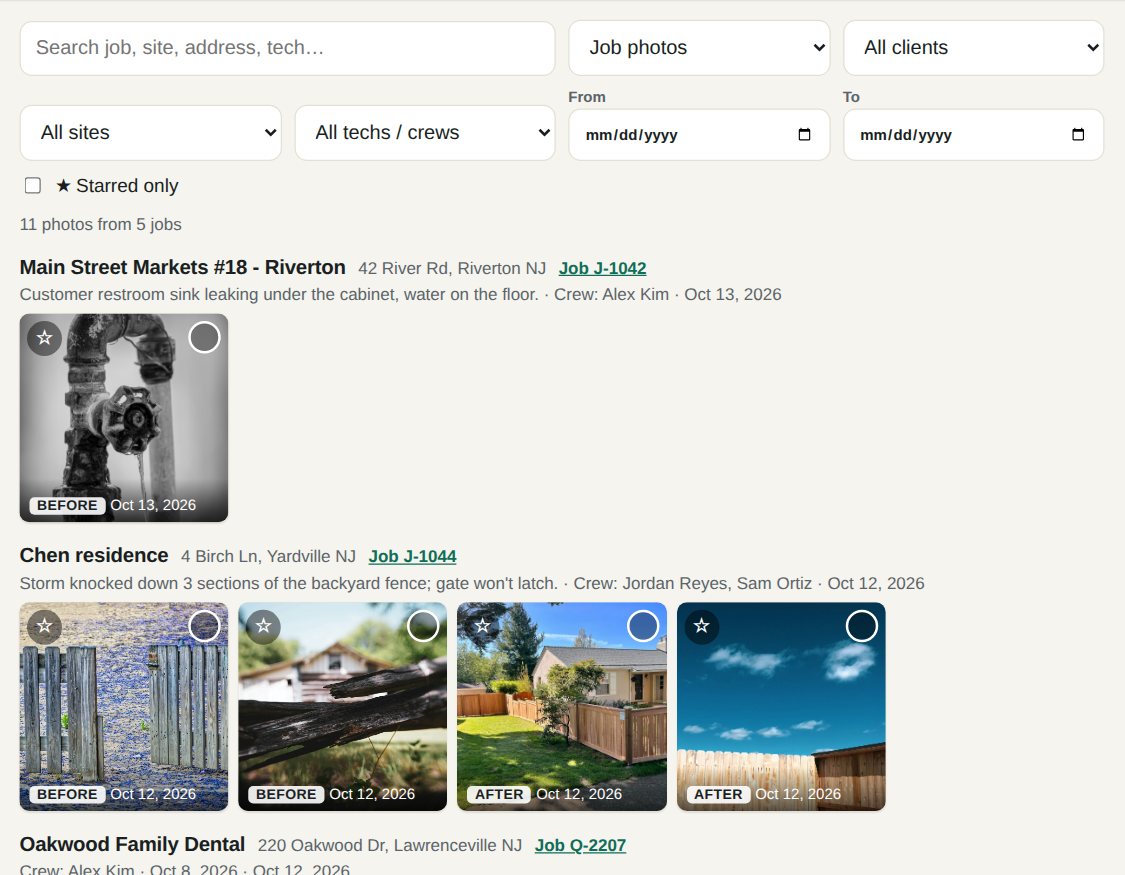
Every before and after photo your techs take lands on the Photos page, grouped by job, with the address, the job number, what was wrong and who was on the crew. Nobody has to text or email photos in.
Search by customer, address or tech, or narrow it down to before photos, after photos, one site, one crew or a date range. Click a photo to see it full size and flip through the rest with the arrow keys (or swipe on a phone). Click Download to save it for the customer, your website or social media. Tick the circle on several photos to download them all at once.
Take jobs and book visits on the Jobs page
A customer calls or emails? Click + New Job on the Jobs page. Pick the customer, or click + New customer to add one right there (residential or commercial, with its site), say what's wrong, and add the customer's work order number if they gave one. If not, the app numbers the job (J-1001, J-1002…). Pick a tech and a day to book a visit right away. It shows up on that tech's phone.
Every job shows what it's waiting on: New, Scheduled, In progress, Waiting on parts, Waiting on approval, Needs return visit, Ready to bill, Billed or Closed. It moves along by itself as techs work and invoices go out. Click a job to see all of its visits, book a return visit, mark it waiting on parts (with a note like "ETA Friday"), or close it without billing.
The Schedule tab shows who's on the way, who's on site right now and every visit that's booked, by day. To book a visit by work order number without writing up a new job, use + Schedule a Visit on the Jobs tab.
The other pages, in one line each
Long lists show 20 at a time with a search box. Theme in the header switches between Auto, Light and Dark.
Some pages only appear if your plan includes them.
Stuck on something?
Email steve@clipboardzero.com with what you were trying to do. A screenshot helps.